2017 - 10 - 14 (토)
코드로 배우는 스프링 웹프로젝트[구멍가게 코딩단 지음] 참조
1 .. Spring과 MyBatis 연동
라이브러리 추가
1.. mvnrepostorty 에서 MyBatis / MyBatis-Spring / spring-jdbc / spring-test 라이브러리를 pom.xml 추가해줍니다.
(Spring-test는 ByBatis가 정상적으로 연동되었는지 확인하는 용도로 사용한다.)
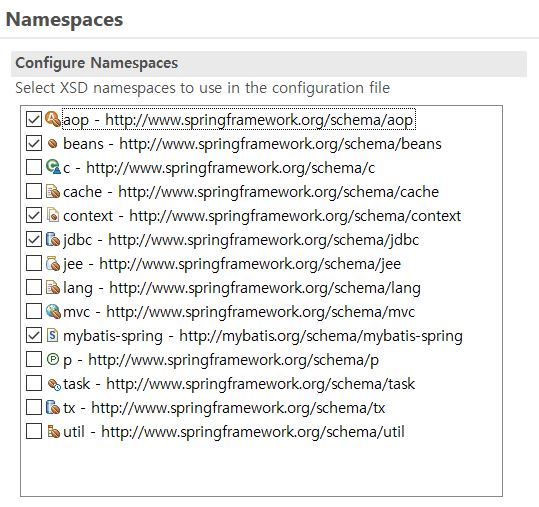
2.. 위의 화면처럼 src/main/webapp/WEB-INF/spring/root-context.xml에 Namespace를 추가해준다.
(이 파일은 스프링 설정 시 웹 자원과 관련되지 않은 모든 자원의 설정을 위해 필요하다.)
3.. JDBC 연결을 위해서 아래의 코드를 root-context.xml에 추가해준다.
//root-context.xml
//spring-jdbc의 클래스를 이용하기 위함

<bean id="dataSource"

		class="org.springframework.jdbc.datasource.DriverManagerDataSource">
		<property name="driverClassName" value="com.mysql.jdbc.Driver"></property>

		<property name="url"
			value="jdbc:mysql://127.0.0.1:3306/book_ex?useSSL=false"></property>

		<property name="username" value="zerock"></property>
		<property name="password" value="zerock"></property>
	</bean>
4.. DataSource test클래스를 작성한다. (src/test/java/org/zerock/web)
//@Runwith 과 ContextConfiguration은 현재 테스트 코드를 실행할 때 스프링이 로딩되도록 하는 부분이다.
//@ContextConfiguration애너테이션의 location 속성에 스프링을 로딩할 경로를 넣어준다.
@RunWith(SpringJUnit4ClassRunner.class)
@ContextConfiguration(locations= {"file:src/main/webapp/WEB-INF/spring/**/root-context.xml"})
public class DataSourceTest {
	//@Inject애너테이션은 스프링이 DataSource 객체를 생성해서 주입하도록 한다.
	//앞에서 배운 @Autowired 와 비슷한 느낌인거 같다.
   @Inject
   private DataSource ds;
	 //@Test 단위테스트를 위한 에너테이션이다.
   @Test
   public void testConnection()throws Exception{
      try(Connection con = ds.getConnection()){
         System.out.println(con);
      }catch(Exception e) {
         e.printStackTrace();
      }
   }
}
5.. 위 테스트로 스프링이 로딩될 떄의 로그들과 Connection객체가 생성되었다는 것을 확인할 수 있다. ( pom.xml 에서 JUNIT의 버전은 4.11 이상으로 )
6.. 다음은 mybatis-config.xml을 src/main/resources내에 생성한 뒤 아래의 코드를 넣어준다.
<?xml version="1.0" encoding = "UTF-8"?>
<!DOCTYPE configuration
	PUBLIC "-//mybatis.org//DTD Config 3.0//EN"
	"http://mybatis.org/dtd/mybatis-3-config.dtd">
<configuration>
</configuration>
<!--내용참고(http://mybatis.org/mybatis-3/ko/getting-started.html)-->
7..mybatis-config.xml 파일이 스프링이 동작할 때 같이 작동하도록 설정해주기 위해 root-context.xml에서 아래 코드를 추가해준다.
<bean id="sqlSessionFactory" class="org.mybatis.spring.SqlSessionFactoryBean">
		<property name="dataSource" ref="dataSource" />
		<property name ="configLocation" value="classpath:/mybatis-config.xml"></property>
</bean>
8.. Mybatis 연결을 테스트 하기위해 test/org/zerok/web 에 MyBatisTest클래스를 추가하고 테스트한다.
package org.zerock.web;

@RunWith(SpringJUnit4ClassRunner.class)
@ContextConfiguration(locations= {"file:src/main/webapp/WEB-INF/spring/**/root-context.xml"})
public class MyBatisTest {
   @Inject
   private SqlSessionFactory sqlFactory;
	 //스프링이 정상작동할 경우 SqlSessionFactory 객체를 자동 주입한다.
   @Test
   public void testFactory() {
      System.out.println(sqlFactory);
   }
   @Test
   public void testSession()throws Exception{
      try(SqlSession session = sqlFactory.openSession()){
         System.out.println(session);
      }catch(Exception e) {
         e.printStackTrace();
      }
   }
}
9.. 이 테스트가 정상 작동되면 MyBatis 연결이 완료된 것이다.
